Where to Mount your Golf Simulator Projector – Pitfalls + Example Placements
https://mygolfsimulator.com/where-to-mount-your-golf-simulator-projector/

Where to mount your golf simulator projector is one of the toughest elements of golf simulator planning you will face. You need to choose a projector position that fulfills multiple important criteria.
The perfect golf simulator projector placement balances three principles. Projectors should be mounted away from your swing area, and in front, as placements behind you will cast shadows on the impact screen. Finally, the throw ratio must match the throw distance to project a perfectly sized image.
You’ve researched your perfect projector. You’ve bought it and have set it up, bolted in place. Imagine your first swings in your new simulator, and the excitement you’ll feel. Your shadow is projected onto the screen, making your simulator unusable. Worse, you nail your projector with your swing!
I’ve taken what I have learned with my simulator, my golf simulator projector research, and the experiences of other golf simulator enthusiasts to bring you advice on exactly where to mount your projector for the best home golfing experience.
Read my guide to learn where to mount your golf simulator projector and avoid these mistakes!
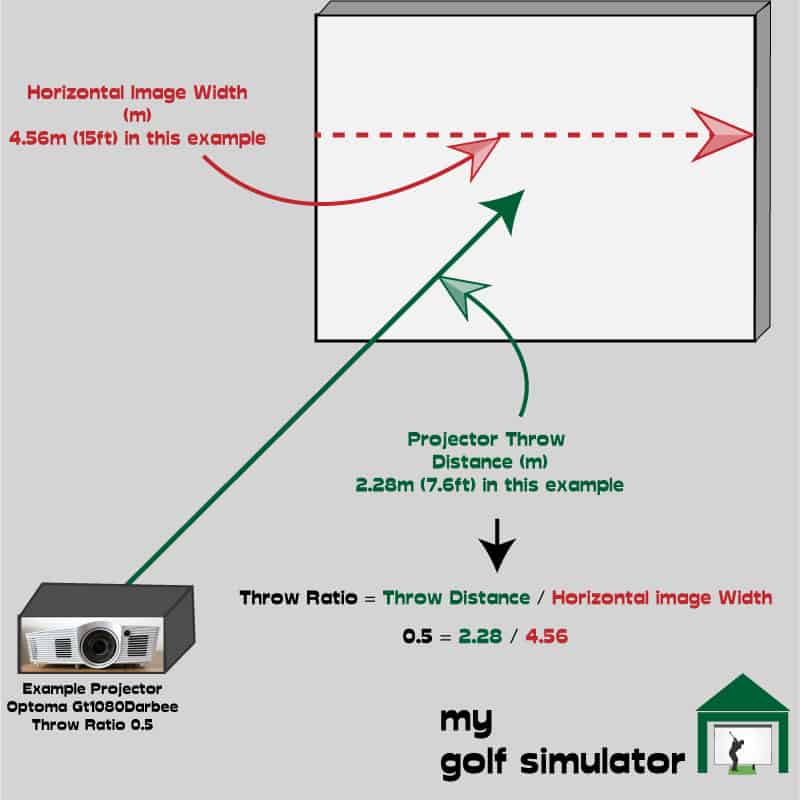
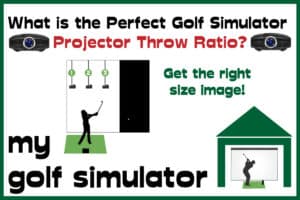
The throw ratio is the ratio of throw distance (the distance from projector to screen) to the horizontal image width.
For a projector with a throw ratio of 2, for every 1 foot of image width, the projector would need to be 2ft away from the screen. So if you wanted a 10ft wide image projection, you’d need the projector 20ft away. (this is the case for projection in 16:9, it is slightly different when projecting with an aspect ratio of 4:3).
| Projector Type | Throw Ratio | Projected Simulator Image horizontal width | Distance from Screen |
|---|---|---|---|
| Standard Throw | ~1.5 | 14ft | > 21ft |
| Short Throw | 0.4 - 1 | 14ft | 5.6 - 14ft |
| Ultra Short Throw | 14ft |
I hope this table illustrates the throw ratios for different types of projectors. There are also ‘long throw’ projectors, but they are not suitable for golf simulators.
Some projectors have ‘zoom lenses’ which means that you can increase and decrease the size of the image without moving the projector. These projectors may be more expensive than those without zoom lenses, but can possibly solve small issues you have with throw ratios are just a little out.
You can see that a standard throw projector will likely need to be positioned too far from the screen unless it has a zoom lens.
Ultra short throw projectors are fantastic (and expensive) but you’d have to position a little too close to the screen. I’d be worried I’d nail it with a ball, or that it would obscure my view of the screen from where I’m swinging. A short-throw projector seems to be the sweet spot.
You need to ensure that your chosen projector, at your chosen distance from your screen, will project an appropriately sized image.
For your golf simulator, I believe the sweet spot is a short-throw projector – with a throw ratio between 0.40 – 1.0.
Take a look at the throw ratio and related features of our recommended golf simulator projectors here.
So, we’ve decided on buying a short throw projector.
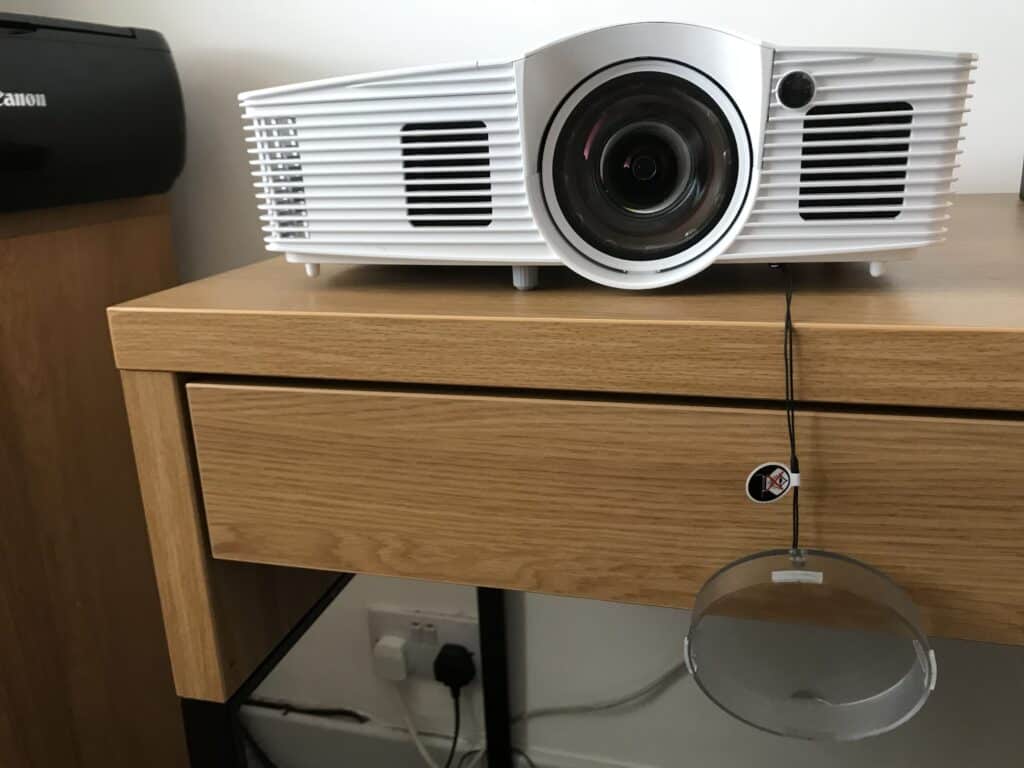
Take the Optoma GT 1080 Darbee for example. The throw ratio of this projector is 0.5 : 1.
For a short throw projector, such as this, to project a horizontal screen of size 14ft you’d need to mount it 7ft from the screen.
Even this could be a bit close to the screen for some people, so you may want to choose a projector with a throw ratio more like 0.7. There are several projectors in our recommended list with throw ratios like this. They’d give you a 14ft image width when positioned 9ft 9in from the screen.
I believe the ‘short throw’ projectors are the sweet spot here because if you buy an ultra short throw projector and mount it 1-2ft to the screen, you may end up in one of two scenarios:
- You might hit the projector with the ball (you’d need to create a protective case)
- The projector and case might end up obscuring your view of the screen from where you stand.
You can use this link to calculate the distance from the screen that a given projector will need to be mounted to show a certain size image. If you input your projector and the screen size you want it will show you the distance you’ll need to mount it from the screen.
You can compare various projectors you’ve been looking at online to ensure they meet this essential point.
If you mount your projector too close to your screen, you’re at risk of hitting it with a ball.
This can be the risk of using ultra-short-throw projectors in golf simulators. Imagine spending all that money only to sky a driver shot and take out the projector from below.
It is still possible to use such a projector at a short distance from the screen but you’d need to house it in a very sturdy casing.
You could have a floor-mounted ultra-short-throw projector near to your screen, though it could be a problem if you were looking to incorporate a putting setup into your simulator.
Another problem with projectors mounted too close to the screen is that the projector itself can obscure your view of the screen.
A projector mounted behind you may cast your shadow onto the screen. If there is just a shadow of a club swinging that can be acceptable but the shadow of a 6ft golfer may spoil your experience.

If you mount your projector far from your screen and have a higher throw ratio then the projected image may be too large for your screen as we discuss above.
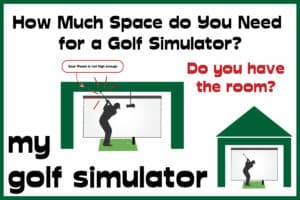
Height is the most important dimension when planning a golf simulator room.
Your golf simulator journey will stall (and likely end) if you don’t have the headroom, it’s as simple as that.
My recommended minimum height for your room is 8.5ft (2.59m) and I think a comfortable height would be more like 10ft.
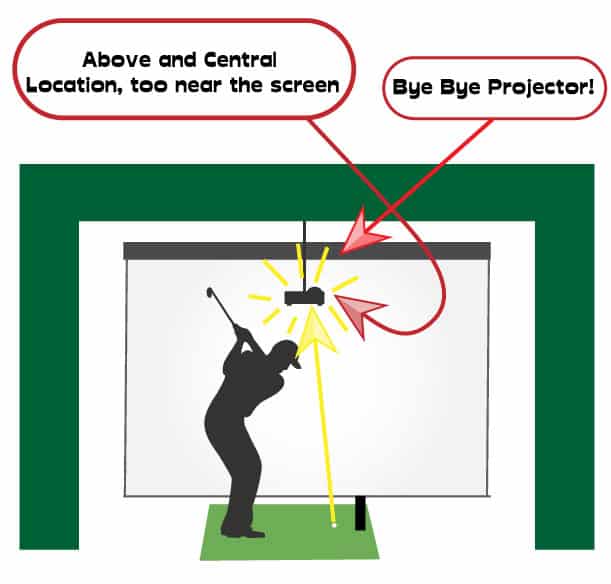
Say you have just enough headroom to go ahead and make your simulator, but you want to still have a ‘above-central’ or ‘above-off centre’ projector placement. You are therefore more likely to have issues hitting your projector with your swing (or even your head when you stand up).
Below, we discuss floor-mounting and side-mounting your projector. These are serious options if you have limited height in your simulator room.
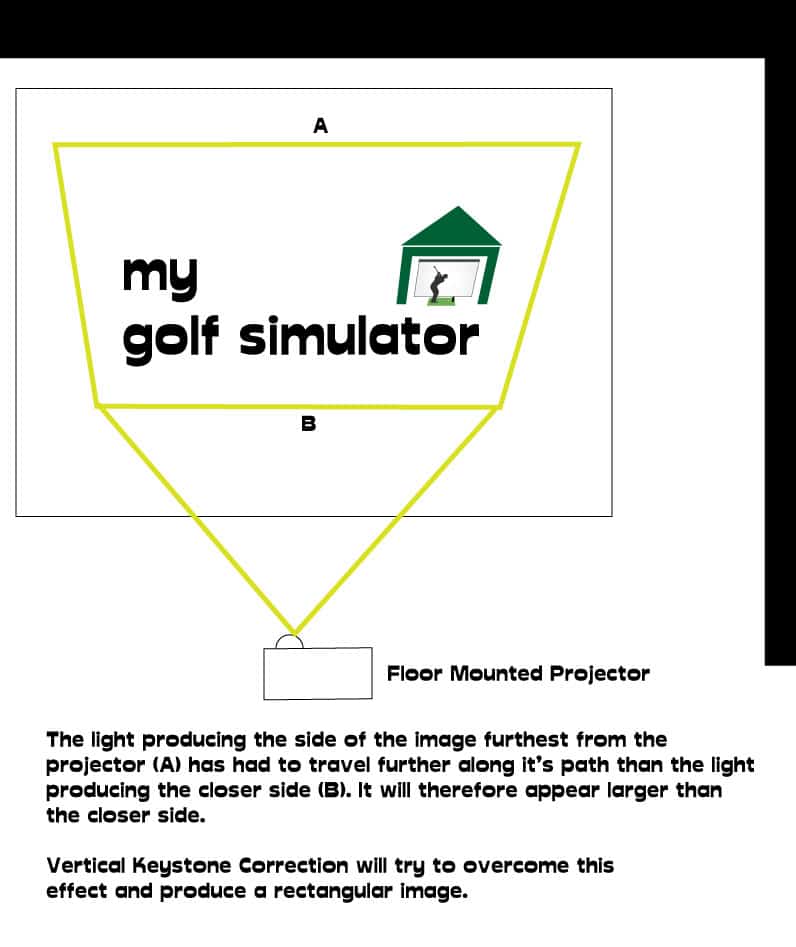
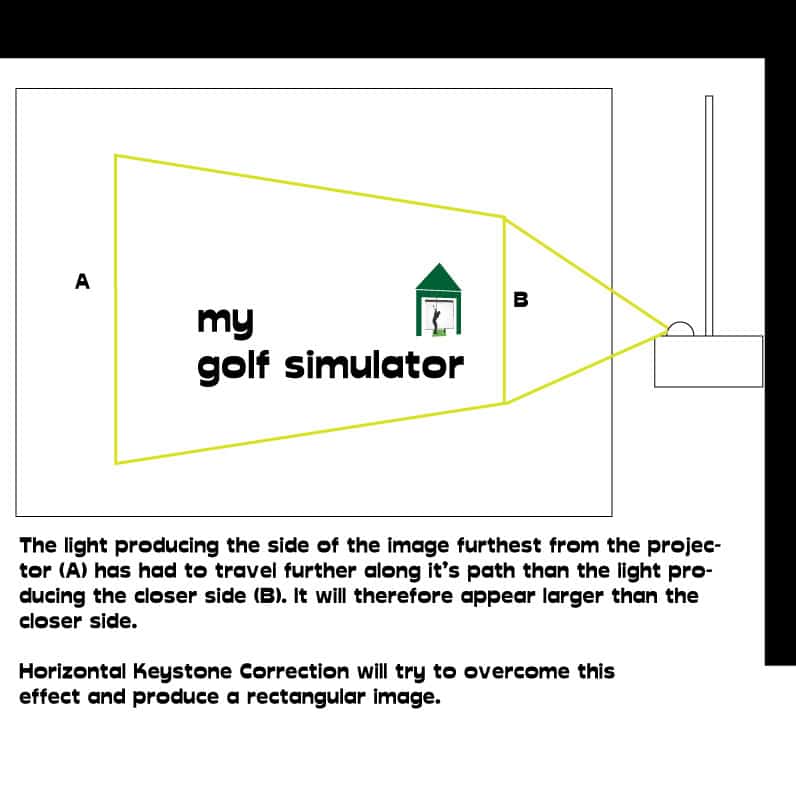
This is a feature of some projectors that allow you to project a completely rectangular image despite your projector being off to an angle.
This is essential if you want to floor mount or side mount your projector.
Horizontal keystone correction seems to be a more premium and elusive feature, being present on only some of the higher-end projectors out there.
You must note though that relying on keystone correction will likely result in a reduction in image clarity given that the process works by digital image alteration.
We have a whole post on this topic here. You can also check out which projectors have vertical and horizontal keystone correction features in our list of recommended projectors here.
Zoom lensing allows a projector to change the size of the projected image either manually or digitally.
This image size alteration will occur despite the fixed throw ratio of the lens, which is intrinsic to its optics.
A zoom lens may only change the rectangular projected image by 10 or 20% but this can be great if you need to tweak the image to fit your impact screen perfectly.
Be careful though, using the zoom on a projector may lead to reductions in image clarity.
Whilst zoom lensing alters the image size, keystone correction skews the image up, down or to the side.
You need to be absolutely confident that you won’t hit the projector with your swing. This is as important as having a room that’s wide and high and long enough. Subconscious doubts will adversely affect your swing.
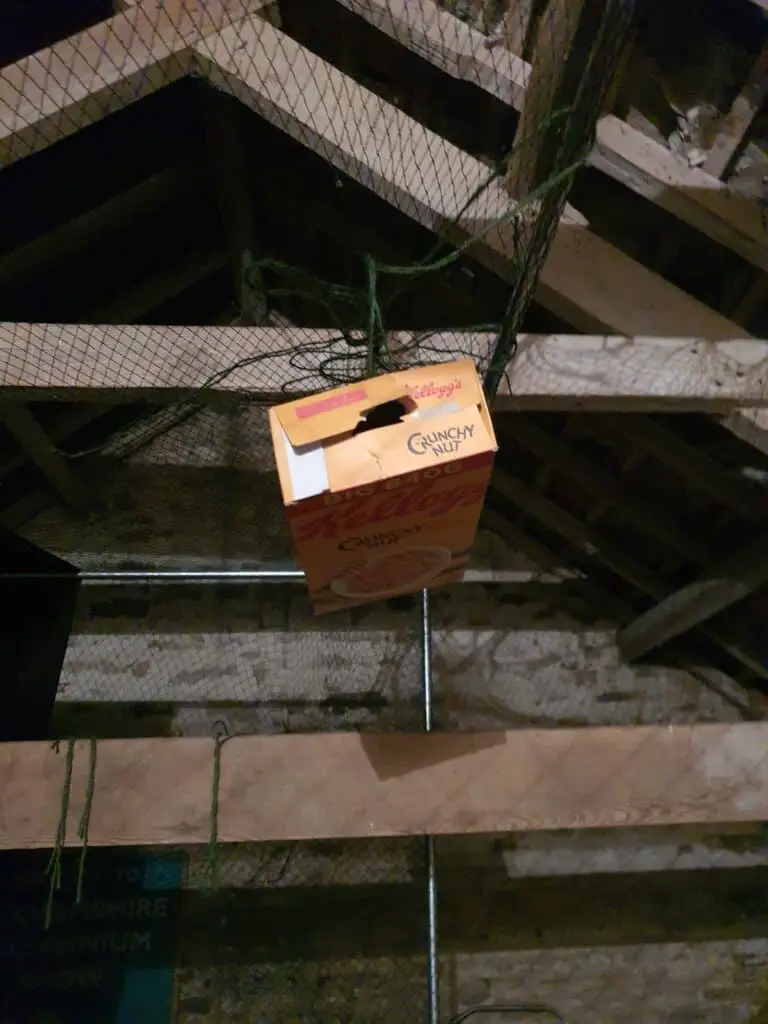
What I did was hang two pieces of string from the ceiling to the place where I was considering hanging the projector. Next, I attached a light cardboard box to the pieces of string which acted like the projector. I then swung driver in every way i could think of, even trying it left handed.
The box met it’s end with the left handed swing! It was an excuse to buy more cereal!
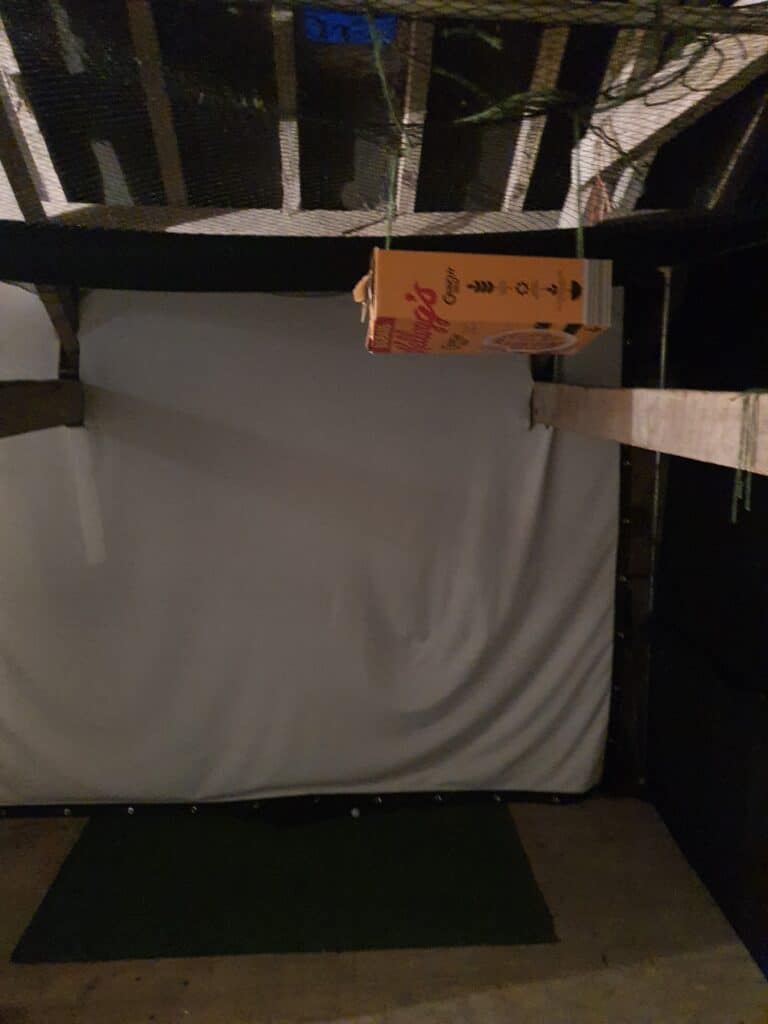
I altered my string and box combination, moving it backward 1ft and my hitting mat forward 6 inches. This gave me extra room, I was still an adequate distance from the impact screen and my projector didn’t project shadows onto the screen. I used my Optoma’s zoom lensing to resize the image to where it had been pre-move.
I did my string and box testing again and I couldn’t hit the box even if I tried!
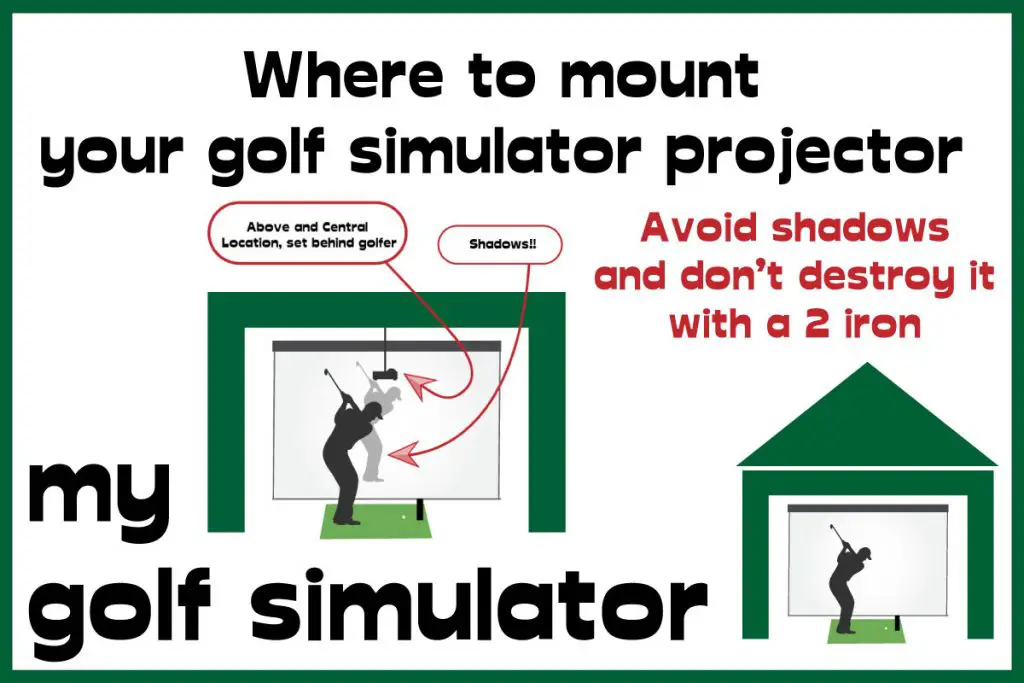
This is ‘position A’.
If you have a room that is tall and wide enough to allow your projector to be placed centrally and above your swing, you should be able to project a perfect rectangle onto your screen whilst maximizing the clarity of your image.
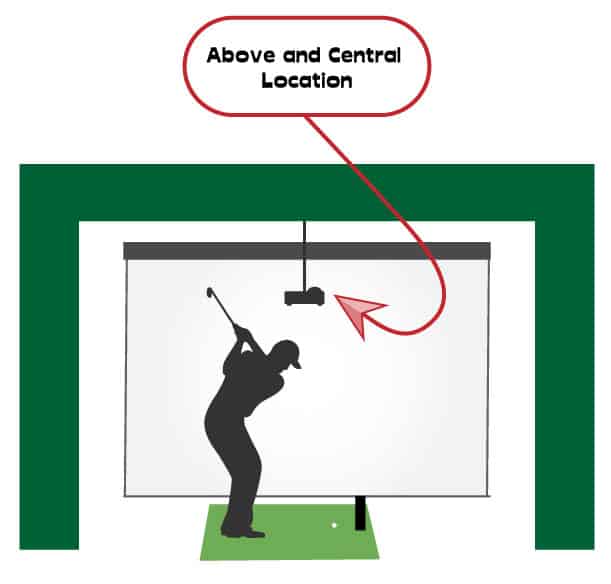
Achieving the perfect central projector position means you still have to try out and test positions in the long axis and the height axis.
However, when I talk about above and central, I’m not talking about placing it too high. Too high and you’ll run into the same problems as you’ll find with a floor-mounted setup and require vertical keystone correction to reduce the trapezium screen shape.
You need to find a height which means you can get a good projection but still be out of the reach of you and your swing. Using our cereal packet on string method will help you check out a range of heights.
You must decide on your desired projected image width before you start planning your projector positioning.
Your projector’s throw ratio will dictate the perfect throw distance required. This depends on your desired image size, which you must decide upon before planning all your projector positioning.
Say you want a screen size of 13ft wide along the horizontal axis. This will fit within your 14ft wide impact screen with 6 inches to spare on each side. You will need to use the formula below:
Throw distance (ft) = Throw Ratio x Horizontal Screen width (ft)
For our above example, using a projector with a throw ratio of 0.72, we’d get a throw distance of 9.3ft. This is how far from the screen you need your projector.
If you need to alter this distance because of room restraints or because it’s getting in the way of you or your swing, you have the following options:
- Move your projector to the adjusted position and assess how this changes your projected image. If it’s now too big or small, see if your can make small adjustments using your projector’s zoom if it has it.
- Can you alter your swing position to allow more room for projector positioning?
- Last resort options would include proceeding with an imperfect projected image size, or changing projectors.
Check out our post on How Much Space You Need for a Golf Simulator Projector here where we talk more about these issues. We also discuss what to do if you’re struggling with a lack of height, width and length in your simulator room.
This is position ‘B’ or the second-best position.
An above and off-centre position should still allow you to attain a clear rectangular image without needing to resort to keystone correction.

You may have to ‘point’ the projector medially to a small degree but this shouldn’t result in the horizontal trapezium shape image you’d get from a full side-mounted setup.
The same considerations above regarding distance from the screen and the actual height apply to this setup position too.
It is likely that if you’re considering side-mounting your projector then you have considered and tried the above options. You may also have some constraints on your room dimensions too.
Don’t worry though as side-mounting might be a great option for you.
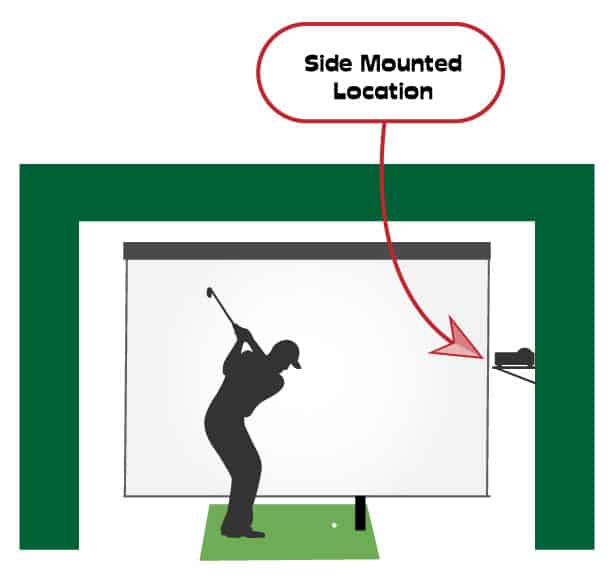
You’ll be able to mount your projector well away from you and your swing. Plus you’ll have the bonus of much easier cable management too.
Another advantage is you’ll be able to choose the height of your projector based on the centre of your impact screen and nothing should get in its way.
A side-mounted setup definitely needs a projector capable of horizontal keystone correction though as the projected image will come out looking more like a trapezium than a rectangle.
Relying on horizontal keystone correction will very likely reduce the clarity of your image somewhat. This is likely to be a price worth paying if you have very limited options on projector placement in a small simulator space though.
Please note only some of our recommended projectors come with horizontal keystone correction so ensure your projector is able to manage this task before you commit to a side-mounted setup.
We have a whole post coming up soon on side-mounting your projector so stay tuned!
Another option for those with limited space for their simulator is choosing a floor-mounted setup.
You will need an adequate enclosure to act as a barrier for your projector, otherwise, you could still nail it with your 2 iron when you fire a Tiger like stinger towards your screen.
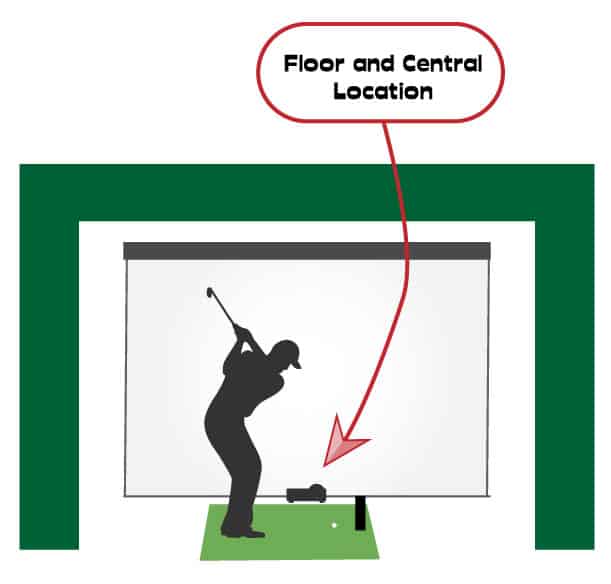
Using such an enclosure to house your projector may also limit the space you have for other features in your simulator such as a putting setup.
Similarly to the side-mounted projector position, you’ll need to rely on keystone correction (vertical) to avoid a trapezium-shaped image.
All our recommended projectors feature vertical keystone correction. Not all correct to the same amount of degrees so you should read their product descriptions carefully.
We have a whole post on this subject coming up soon!
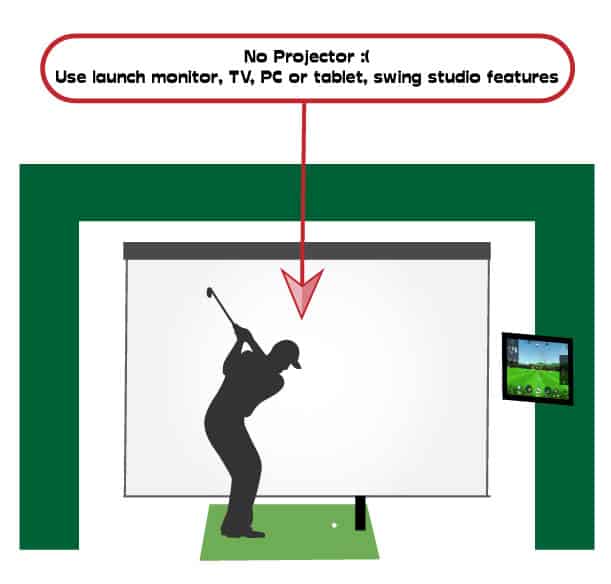
This is the last resort!
You should only arrive here if you’ve tried all of the above. You may still be seeing shadows on the screen or even hitting your projector despite all your best efforts.
If you absolutely have to abandon your projector, you can still have a simulator setup. It just won’t have the same fidelity as you wanted.
You could have any of the following:
- Still use your simulator and even PC simulator software, but using a TV screen, computer monitor or iPad set up nearby. The disadvantage of this is you’ll have to guess your aim much more than if you can see it on your impact screen.
- Use your hitting bay to practice your swing. You can still use a launch monitor to calculate your distances. You can still set up other swing studio features such as mirrors and swing cameras.
- Abandon your full-swing simulator and create an indoor putting green instead.
- Abandon your simulator completely.
I recommend the SIMBR Universal Ceiling Projector Mount. This is a sturdy, extendable projector mount that should fit all of our recommended projectors. It is for ceiling use and you can adjust the height within a range of up to 25 inches.
Buy it here in the UK and here in the US
I have seen other projector mounts available that you can adjust the position in the length axis as well as the height. One I saw on Youtube was called Skyrail. I have not used this mount but please check it out!
Check out our list of recommended projectors here! You can read our projector articles all about the features of each projector and how they are relevant to your simulator setup.
Make sure you do your research before buying!
After reading this post you should be better equipped to decide on the positioning of your projector within your golf simulator.
To recap, follow these steps and you should be able to find a your perfect projector position.
- Take stock of your room dimensions. Answer questions like whether you have the room width to set up with your ball in the centre of your room, do you have ample height to have a projector above you and are you limited by room length?
- I would really stress how helpful the cereal box and string method is in testing our projector positions!
- If you’re confident you’ve found the perfect projector position, take a look at our other projector articles to learn about their other features and specifications.
- If you need to take the plunge into a side-mounted or floor mounted set up, make sure you have the equipment for mounting and protecting the projector. We have specific articles coming soon on these projector positions.
- Check out our list of recommended projectors 😀
Happy Home Golfing!You need a short-throw projector. This means a throw ratio of between 0.4-1.0. A projector with a throw ratio of 0.5 will give you a horizontal screen image of 15ft wide when mounted 7ft 6 inches from the screen. A standard throw projector will need to be mounted much further from the screen for the same image size. We explain what these terms mean and their impact on your golf simulator in this article.
The absolute minimum dimensions you need for your golf simulator are 12ft (3.65m) long x 10ft (3.05m) wide x 8.5 ft (m) high. There are many reasons why you will need a larger space than this. You need as much room as you need to comfortably swing your driver and not have any anxiety at all about hitting the ceiling or wall. You could say that the ideal dimensions for a golf simulator would be one with unlimited space. Not many people have a garage the size of an aircraft hanger though. The dimensions you’ll need for a comfortable space are:
- 18ft long
- 10ft high
- 15ft wide (if used for right and left-handed golfers)
- (13ft wide if used for either right or left-handed golfers
The absolute minimum dimensions you need for your golf simulator such as Skytrak are 12ft (3.65m) long x 10ft (3.05m) wide x 8.5 ft (m) high. There are many reasons why you will need a larger space than this. You need as much room as you need to comfortably swing your driver and not have any anxiety at all about hitting the ceiling or wall. You could say that the ideal dimensions for a golf simulator such as Skytrak would be one with unlimited space. Not many people have a garage the size of an aircraft hanger though. The dimensions you’ll need for a comfortable Skytrak space are:
- 18ft long
- 10ft high
- 15ft wide (if used for right and left-handed golfers)
- (13ft wide if used for either right or left-handed golfers